


📅 Updated: May 2025 · ⏱ 8 min read · ✍ Digital Trekk · 🔑 Focus keyword: google adsense account
I’m not just another blogger writing about how to get a Google AdSense account approved.
When I first tried to get my own Google AdSense account approved for digitaltrekk.com, Google said no. No explanation. Just a rejection email and silence.
I could have given up. Instead, I spent days figuring out exactly what the AdSense review team was actually looking for — things most guides never mention. Fixed everything. Reapplied. Got my Google AdSense account approved.
Then a friend asked me to help. Then a client. Then another. 50+ Google AdSense account approvals later, I’ve seen every rejection reason and know exactly how to fix each one.
This guide is everything I learned. Not theory. Not copy-pasted tips. Real experience from someone who has been rejected, fixed it, and helped 50+ others get their Google AdSense account approved.
|
💡 Quick Note Before We Start This is not a “just publish 15 posts and apply” guide. I’m going to tell you what actually works in 2025 — based on real experience helping 50+ blogs get their Google AdSense account approved. |
📚 Want My Complete AdSense Approval System as a PDF?Everything in this guide PLUS my personal checklist, rejection recovery guide, real screenshots, and India-specific tips. Used by 50+ bloggers to get their Google AdSense account approved. ✓ 25-point pre-application checklist ✓ Rejection recovery roadmap ✓ India-specific tips (6-month rule, PAN card, RPM) ✓ Instant PDF download via Razorpay
|
🤔 What Is a Google AdSense Account and Why Is Approval Hard?
A Google AdSense account lets your website earn money by displaying Google ads. Every time a visitor views or clicks an ad, you earn. Simple idea — but getting your Google AdSense account approved is where most Indian bloggers get stuck.
Google reviews your site like a real person and asks:
|
✦ “Is this a real, trustworthy website?” |
If the answer to any of these is “no” — your Google AdSense account application gets rejected. In 2025, Google’s Helpful Content update makes this even more important.
✅ Google AdSense Account Eligibility — Complete Checklist
Go through every point below before applying. Skipping even one is the most common reason for rejection.
|
📝 Content Requirements
|
|
🌐 Domain & Website
|
|
📄 Required Pages — Non-Negotiable
|
|
⚙️ Technical Checklist
|
|
⭐ My Tip on the About Us Page Google reviewers actually read it. Don’t write “Hello, I am a blogger.” Tell your real story — why you started, your background, what readers will gain. A genuine About page builds trust instantly with both Google and your audience. |
🚀 Google AdSense Account Approval Process — Step by Step
Checklist done? Good. Let’s walk through the actual Google AdSense account sign-up and approval process with real screenshots.
Step 1: Sign Up at google.com/adsense
Go to google.com/adsense and click “Get Started.” Sign in with your Gmail. You’ll land on this screen:
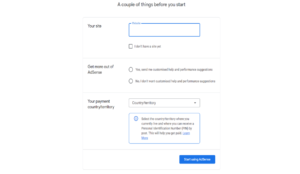
| 1 | Enter your website URL in the “Your site” field |
| 2 | Select “Yes” for personalised suggestions |
| 3 | Choose India as your payment country — cannot be changed later |
| 4 | Click “Start using AdSense” |
|
⚠️ Important Your payment country cannot be changed after setup. Double-check you’ve selected India before clicking Start. |
Step 2: Complete Your Google AdSense Account Dashboard
Once inside your Google AdSense account, you’ll see three tasks. Complete all of them — especially Sites which is marked Required.
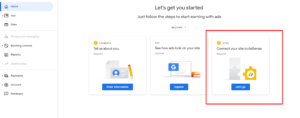
| 1 | Payments (Required) — Enter your full name as on bank account, address with PIN code, phone number |
| 2 | Ads (Optional) — Preview how ads will look on your site |
| 3 | Sites (Required — most important) — Click “Let’s go” to connect your website |
Step 3: Add the AdSense Code and Request Review
After clicking “Let’s go” under Sites, Google gives you a unique code snippet. This is the most critical step.
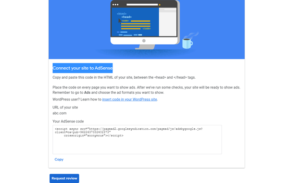
| 1 | Copy the AdSense code shown on screen |
| 2 | In WordPress — install free plugin “Insert Headers and Footers” |
| 3 | Paste the code in Header section and save |
| 4 | Go back to AdSense and click “Request Review” |
| 5 | Do NOT remove the code until you receive a response |
|
⏱ How Long Does Google AdSense Account Approval Take? Typically 24 hours to 2 weeks. Keep publishing new content while you wait — an active site looks more credible. Most of my 50+ clients get approved within 3–7 days when the site is fully prepared. |
❌ Top 10 Reasons Your Google AdSense Account Gets Rejected
Got a rejection? Don’t panic. Here’s every common reason — and the exact fix:
|
1. Insufficient Content ✅ Fix: Publish 20+ posts, minimum 800 words each. Focus on depth and genuine helpfulness. |
|
2. Content Policy Violation ✅ Fix: Check every post for piracy, adult content, hacking tools, or copyright violations. One bad post rejects the whole site. |
|
3. Missing Privacy Policy ✅ Fix: Generate a free Privacy Policy that covers cookies, data collection, and third-party advertising like AdSense. |
|
4. Domain Too New ✅ Fix: Indian publishers need a domain at least 6 months old. Use this time to build quality content. Don’t rush. |
|
5. Copied or Thin Content ✅ Fix: Run every post through a plagiarism checker. Google detects this easily in 2025. |
|
6. Poor Mobile Experience ✅ Fix: Test your site on your phone. If anything looks broken, fix it before applying. |
|
7. No About or Contact Page ✅ Fix: These are non-negotiable. Make your About page personal and genuine — not just two generic sentences. |
|
8. Copyright Images ✅ Fix: Use Unsplash, Pexels, or Pixabay. Or create your own with Canva. Remove anything you don’t own. |
|
9. Click Fraud / Invalid Traffic ✅ Fix: Never click your own Google AdSense account ads — ever. This leads to permanent bans, not just rejection. |
|
10. Site Not Accessible During Review ✅ Fix: Turn off maintenance mode completely. Your site must be fully live during the entire review period. |
🚀 Want Your Google AdSense Account Approved Without the Hassle?You just read the full guide. But if you’d rather I personally handle your entire Google AdSense account approval — audit, fix, submit, follow up — I offer a done-for-you service.
50+ clients helped · 4.9 star verified rating · I start within 24 hours
Both options via Razorpay · Secure payment |

🎉 Your Google AdSense Account Got Approved — Now What?
| 1 | Turn on Auto Ads — Go to Ads › Overview › enable Auto Ads. Google places ads automatically in the best positions |
| 2 | Complete Payment Setup — Add your bank account details and PAN card. Get paid when you cross $100 (≈₹8,300) |
| 3 | Connect Google Analytics — See which posts get the most traffic and write more of those |
| 4 | Keep Publishing — 2 posts per week consistently. More content = more traffic = more earnings |
| 5 | Don’t obsess over daily earnings — AdSense grows slowly at first. Stay consistent. The money follows the traffic |
|
💡 Real Talk: What Will Your Google AdSense Account Actually Earn? Indian AdSense RPM is typically ₹100–₹500 per 1,000 page views. With 10,000 monthly visitors, expect ₹1,500–₹5,000/month. Combine AdSense with affiliate marketing and your own digital products for maximum earnings. |
❓ Frequently Asked Questions — Google AdSense Account Approval
|
Q: How many posts do I need for a Google AdSense account? No official minimum — but 15–20 quality posts is the safe zone. Quality always beats quantity when it comes to your Google AdSense account application. |
|
Q: Can I get a Google AdSense account without traffic? Yes! There is no minimum traffic requirement. I got digitaltrekk.com approved with very little traffic. Content quality and policy compliance matter far more than visitor numbers. |
|
Q: How long does approval take in India? The review takes 24 hours to 2 weeks. But your domain must be at least 6 months old before Google approves an Indian publisher. Plan for this from day one. |
|
Q: My Google AdSense account was rejected. Can I reapply? Absolutely. Fix every issue in the rejection email, wait 1–2 weeks, then reapply. No limit on applications. |
|
Q: How much does a Google AdSense account pay in India? Typically ₹100–₹500 per 1,000 page views depending on niche. Finance and tech niches pay more. With 10,000 monthly visitors, expect ₹1,500–₹5,000/month. |
|
Q: Can I run affiliate marketing alongside my Google AdSense account? 100% yes — and I strongly recommend it. AdSense gives passive income from every visitor. Affiliate links give higher payouts when someone buys. Running both is perfectly fine. |
|
Q: What happens if I click my own Google AdSense account ads? Permanent ban. Google’s fraud detection is very sophisticated. Even accidental clicks should be reported immediately through your AdSense dashboard. |
|
Q: Can I use a free domain for a Google AdSense account? Blogger (.blogspot.com) can sometimes work. Free WordPress.com subdomains cannot. A custom domain always gives a significantly better chance of approval. |
| Off-Page SEO Checklist for 2024 → | How to Setup Google Analytics → |
| Mastering SEO Hacks for Beginners → | Best AI Tools for Productivity → |


