Are you looking to find out, how to setup eCommerce tracking in your WordPress website to track purchases, transactions on the website? Setting up eCommerce tracking for the eCommerce website will help you find best-selling products. With eCommerce tracking, campaign performance, user behaviour, transaction data, products you sold, revenue, and more can be accessed.
In this blog, we will talk about how to set up eCommerce tracking in WordPress.
Why to set up eCommerce tracking on the website
By using Google Analytics eCommerce tracking, you can match real sales data as well as website usage. This sales analysis is helpful to understand the performance of your website landing pages and ROI from your marketing campaigns.
The eCommerce reports help you analyze purchase activity on your website or application. You can see which products were bought, eCommerce conversion rate, average order value, discounts vouchers used, time to purchase, and checkout process funnels.
Setting Up eCommerce Tracking in WordPress
The best and easiest way to track the performance of your online eCommerce store is by using MonsterInsights. It’s the best eCommerce Analytics WordPress plugin, and more than 3 million professionals use it.
MonsterInsights helps in setting up eCommerce tracking in Google Analytics without editing code. Moreover, this plugin works with some of the most popular eCommerce plugins, including WooCommerce, MemberPress, Easy Digital Downloads, GiveWP, LifterLMS, and more.
It also shows important stats inside your WordPress admin area, so you can quickly view how your website is performing and get insights to grow your business.
To track eCommerce purchases, You’ll need the MonsterInsights Pro version because it includes the eCommerce addon, dashboard reports, and other advanced tracking features.
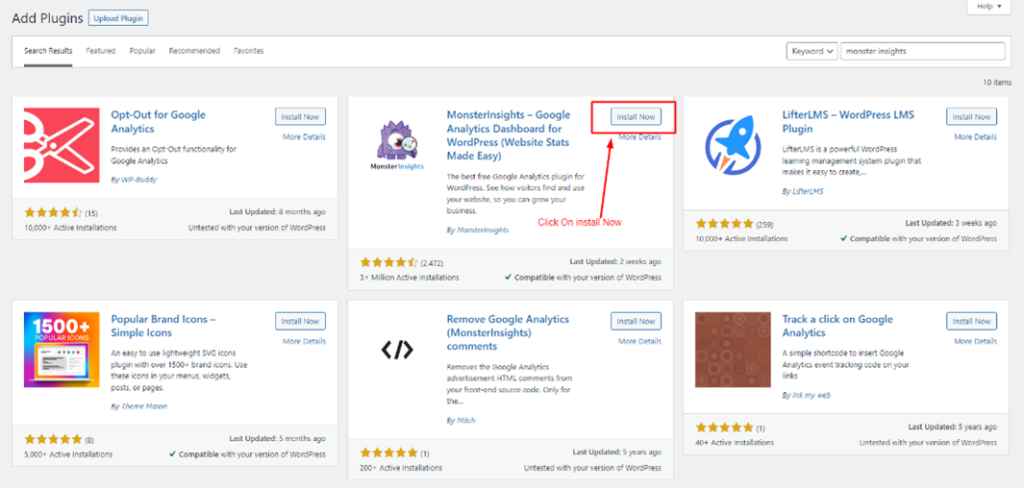
The first step on how to setup eCommerce tracking is to install and activate the MonsterInsights Pro plugin on your website. After activation, you will see the MonsterInsights welcome screen in your WordPress Dashboard. You need to click on the “Launch the Wizard” button to continue.
Step 1

To track eCommerce purchases, You’ll need the MonsterInsights Pro version because it includes the eCommerce addon, dashboard reports, and other advanced tracking features.
Step 2

Next, you need to follow the wizard’s steps to set up the plugin and connect your website with Google Analytics.
After that, you will need to navigate to Insights >> Addons from your WordPress dashboard. After that, scroll down to the eCommerce add-on and click the Install button to proceed.
Step 3

Step 4

Enhanced Ecommerce Reporting
You will need to enable Enhanced Ecommerce in Google Analytics. It allows you to track your customer’s shopping behaviour, top products, checkout behaviour, and sales performance in Google Analytics.
You need to visit the Google Analytics website and log in to your Google account. After that, you’ll have to choose the property where you want to enable Enhanced Ecommerce.
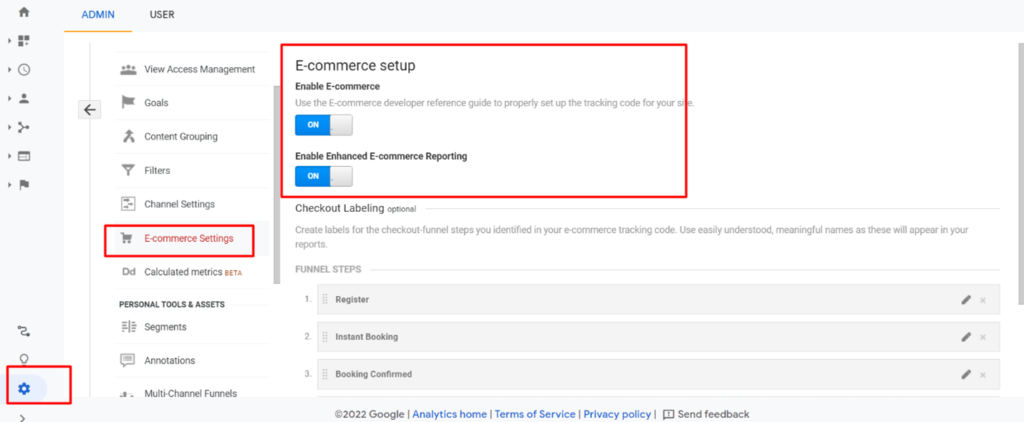
Now, you need to click on the “Admin” settings option from the menu available on the left. After that, you will need to click on “Ecommerce Settings” under the view column. On the next screen, you will need to click the toggles for “Enable Ecommerce” and “Enable Enhanced Ecommerce Reporting” to turn them on. Here, you will find the option to create “Checkout Labeling,” You can use it to label your checkout funnel steps. However, this is optional, and you can go ahead and click on the “Save” button to proceed.

Once you have enabled the Ecommerce setting in Google Analytics, you can go back to your WordPress website dashboard.
After that, you just need to navigate to Insights >> Settings and then open the “eCommerce” tab. Next, you will need to check if the “Use Enhanced eCommerce” option is turned on under the eCommerce Tracking section.
After that, MonsterInsights will automatically detect the WordPress eCommerce plugin and start recording analytics.
Next, you will need to look at how you can use MonsterInsights reports to check the performance of your online store.
View eCommerce Reports in WordPress
Using Google Analytics and looking for the data you need can be exciting for beginners.
MonsterInsights helps to make it super easy to get the data that matters, as it helps to get all the important stats inside the WordPress dashboard. In this way, you get to see how your eCommerce store performs and then make decisions to grow your business.
To check eCommerce reports in WordPress, you can head over Insights >> Reports and open the “eCommerce” tab.

In this report, you can quickly look at an overview of how your online store is doing by checking the conversion rate, revenue, transactions, and average order value.
Moreover, MonsterInsights also show your Top Products. It also helps you to spot the top-selling items as well as quantity, sales percentage, and total revenue. You can make use of this data to find out which products your customers like and then offer similar products to boost sales.
Setup Custom Events in Tag Manager
For tracking steps of add to cart or checkout, you need to set up custom events in tag manager. To do this, you need to follow the below steps:
Creating a New Trigger
- From the left menu, you need to click on triggers and click the new button
- Select the trigger type of the custom event
- Enter the below code in the event name field: gtm4wp.addProductToCartEEC|gtm4wp.productClickEEC|gtm4wp.removeFromCartEEC|gtm4wp.checkoutOptionEEC|gtm4wp.changeDetailViewEEC|gtm4wp.checkoutStepEEC
- Click on the use regrex matching checkbox
- Enter the trigger name and save
Creating a New Tag
- Create a new tag
- Choose the tag type as Universal Analytics
- Set your track type as Event
- Now, add values to Event Category and Event Action
- Enabling advertising and any other feature that you want to enable in the pageview tag
- Click more settings to enable enhanced eCommerce tracking and check use data layer as we did in the previous tag
- Add the trigger we created in the previous step to this tag
- Enter a name for your tag and save the tag
Once you have finished the above steps, you will see eCommerce reports in Google Analytics within two hours. In order to verify your eCommerce setup, go to your website, and purchase a product, and check your eCommerce reports in the analytics later.
Final Words – How to Setup Ecommerce Tracking
This article is helpful for people who are looking for an answer about how to set up eCommerce tracking. You can follow the simple steps explained in this article to integrate eCommerce tracking on your website easily. However, if you have any questions or confusion, just let us know, and we’ll be glad to help you.


